Summary
Editor's rating
Value: is it worth the money versus buying things separately?
Design: simple plastic, but thought through for beginners
Durability: how sturdy it feels and what might wear out
Performance: how the actual brewing and pouring went
What you actually get in the box (and what you don’t)
Effectiveness: does it actually help you brew decent beer?
Pros
- Includes almost all the hardware you need to brew and barrel 40 pints in one kit
- Pressure barrel with control cap allows monitoring and topping up CO₂ (with extra bulbs/tap)
- Straightforward to use for beginners; first batch comes out clean and well-carbonated if you follow the steps
Cons
- Beer ingredient kit, sugar/malt, and CO₂ bulbs + top-up tap are not included, so total cost is higher than it first looks
- Accessories are basic; you may want a better thermometer and will likely replace seals or small bits over time
Specifications
View full product page →| Brand | Balliihoo Homebrew |
Getting 40 pints at home without overthinking it
I picked up the Balliihoo Homebrew Kit Complete Starter Set With Barrel And Co2 Control Cap because I wanted something simple: make beer at home, on tap, without spending weeks researching separate bits. I’d brewed a couple of basic kits years ago using bottles and a random bucket, and I mainly wanted to see if a proper barrel setup made things easier and less messy. This kit looked like a decent middle ground between cheap plastic junk and pro-level gear.
Out of the box, it’s clear this is aimed at people who just want to get going. You get the fermentation bucket, the barrel, a hydrometer, syphon, cleaner, funnels, spoon, jug, even a branded pint glass. What you don’t get is the actual beer ingredient kit or the sugar/malt, which is worth stressing. If you order this thinking it’s "everything in one box including the beer", you’ll be annoyed when you realise you still need to buy a 40-pint kit plus about 1 kg–1.5 kg of fermentables.
I used this kit for one full 40-pint batch (a basic ale kit) and then cleaned everything down ready for a lager next. So this opinion is based on doing the full cycle: unpacking, cleaning, brewing, fermenting, transferring to the barrel, conditioning, and then actually drinking from the tap. No theory, just what worked and what was annoying in practice.
Overall, I’d say it’s a pretty solid starter setup if you want a barrel rather than bottles, but it’s not perfect. A couple of little things could be better, and there are some extra costs you need to know about (CO₂ bulbs, maybe a better thermometer). But if your goal is to get drinkable beer at home with minimum fuss, it does the job well enough to keep using it, not just once and then shove it in the loft.
Value: is it worth the money versus buying things separately?
In terms of value, you need to look at the whole picture: what you pay for the kit, plus what you still need to buy to actually drink beer. The kit itself sits in that mid-range price area for homebrew starter sets with a barrel. It’s not the cheapest bucket-only kit, and it’s cheaper than going full metal keg and CO₂ regulator. For the price, you get a good amount of hardware: bucket, barrel with a more advanced cap, hydrometer, cleaner, and all the little tools.
If you tried to piece this together yourself, buying a bucket, a separate pressure barrel with control cap, hydrometer, cleaner, and all the accessories, you’d probably end up paying a similar amount or slightly more, especially if you go for comparable quality. So on that basis, the value is pretty decent. Where people sometimes get caught out is not realising they still need: the beer kit, sugar or malt, and possibly CO₂ bulbs + tap. Once you add all that, your first 40 pints are not “cheap”, but they’re still well below pub prices per pint.
The fact that the kit seems to last and isn’t obviously disposable adds to the value. This doesn’t feel like a one-and-done toy; it feels like something you can keep using for years if you stay into brewing. Also, the feedback about Balliihoo’s customer service (and my own experience with them answering questions) is a plus. If a hydrometer arrives broken or you have a small issue, they seem to sort it quickly, which matters when you’re new and unsure.
So, in my opinion, value for money is good but not mind-blowing. You’re paying for convenience and a more complete setup rather than hunting for every part separately. If you’re pretty sure you want to brew more than once and you like the idea of a barrel instead of washing 40 bottles, the price makes sense. If you just want to try brewing once, a cheaper bucket-only kit might be enough, and you can skip the barrel and CO₂ stuff altogether.
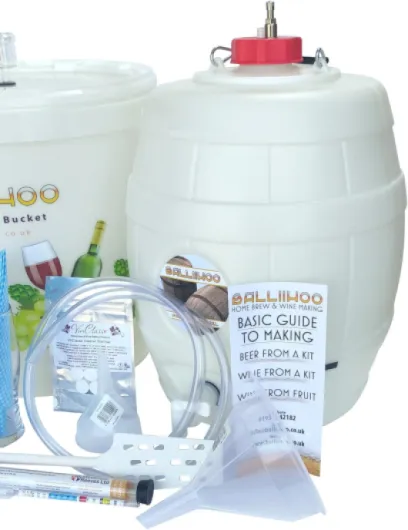
Design: simple plastic, but thought through for beginners
The overall design is very no-nonsense. Everything is plastic, including the barrel, which keeps it light and easy to move even when it’s full (within reason). The fermentation bucket is standard homebrew style: white, basic, does the job. The lid fits reasonably well, and the pre-fitted grommet for the airlock is handy because you don’t have to drill or fiddle with anything. The temperature strip on the bucket is basic but useful. It’s not lab-grade accurate, but it gives you a quick idea if you’re in the right ballpark for fermentation.
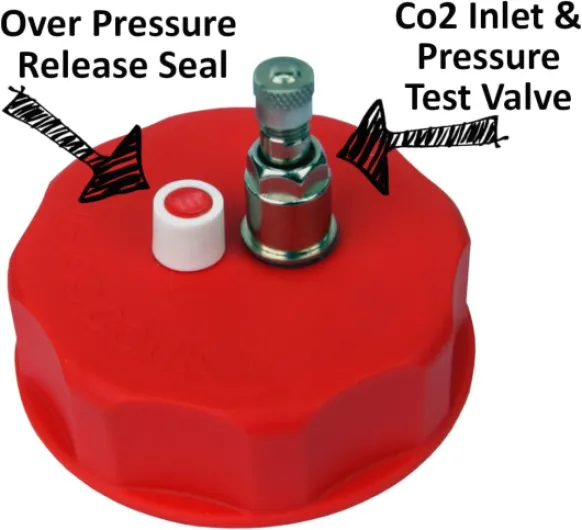
The star of the design is the pressure barrel with the Balliihoo 2" control cap. The cap has two key features: a standard over-pressure release vent and a Schrader-style valve. The over-pressure vent is basically your safety, so you don’t blow the thing up if pressure gets too high. The Schrader valve is nice because you can connect a digital pressure gauge (sold separately) or add CO₂ in a controlled way. In practice, this means you can keep an eye on carbonation and top it up if the pressure drops as you drink the beer.
One detail they mention, and it’s important: you need a thin smear of barrel seal grease or Vaseline around the inside cap seal. If you skip this, you risk leaks and losing carbonation. I followed the advice and didn’t have any issues, but you can see how people who rush this step would end up with flat beer and think the barrel is faulty. So the design is fine, but it expects you to actually read and follow that little tip.
Overall, the design is practical and focused on function, not looks. It’s not pretty; it’s a big plastic barrel and bucket. But the cap system is well thought out for a starter kit, and the fact that you can monitor and control pressure (if you buy the extra bits) puts it ahead of the ultra-basic barrels that just vent and that’s it. I’d rate the design as solid for beginners, with a bit of room to grow if you get more into tweaking pressure and carbonation later.
Durability: how sturdy it feels and what might wear out
Durability is always a bit tricky to judge after just one full batch, but you can get a feel for build quality. The fermentation bucket is standard food-grade plastic. It’s not super thick, but it doesn’t feel flimsy either. The handle feels okay when the bucket is full, though I still support the bottom when moving it, just out of habit. The lid flexes a little when you press it down, but it seals well enough for an airlock setup. As long as you don’t go at it with scouring pads, the bucket should last for plenty of brews.
The pressure barrel is more critical, because if that fails, you lose beer and carbonation. The plastic on the barrel itself feels solid, not thin. The threads on the cap and the barrel neck are clean, and after a couple of open/close cycles for cleaning and priming, they still feel smooth. The main wear point will probably be the rubber seal in the cap. That’s why they insist on a light smear of grease or Vaseline. If you look after that seal and don’t over-tighten the cap like a maniac, it should last a good while. Replacement seals are usually cheap anyway, so it’s not a big worry.
The smaller accessories (spoon, jug, funnels, cloths) are nothing fancy, but they’re fine. The cloths will probably be the first to degrade if you keep using them for cleaning; I’d personally just swap them for my own microfibre cloths after a few uses. The hydrometer is glass, so obviously you need to be careful. That’s not a design flaw, that’s just how hydrometers are. Keep the tube it comes in and store it in that between brews.
After one full use, including a full clean-down afterwards, nothing cracked, warped, or leaked. That’s a good start. I don’t see any obvious weak points apart from the usual seals and gaskets that any pressure barrel relies on. With normal use and sensible cleaning (no boiling water, no harsh abrasives), I’d expect this kit to handle many batches. Just be ready to replace seals or the odd accessory over time, which is normal for this type of gear.
Performance: how the actual brewing and pouring went
On the brewing side, the kit does exactly what you need and nothing fancy. I mixed the kit in the fermentation bucket, used the included spoon and jug, and the bucket was big enough with room to spare. The temperature strip helped me confirm I was in the safe zone for yeast. Fermentation kicked off as expected within about 24 hours, and the airlock bubbled along nicely. No leaks from the lid, no mess. So for the first main step, it just worked.
Transferring to the barrel was also straightforward. The syphon with racking cane is basic but usable. My only gripe is that it’s not self-starting, so you have to do the usual manual start, which can be a bit annoying if you’re not used to it. Once the beer was in the barrel with priming sugar, I sealed it up, added the smear of Vaseline to the cap seal, and left it to condition. After about 10–14 days at room temperature, the barrel had firmed up nicely, which is a good sign of carbonation.
Pouring performance from the tap was decent. Once the pressure built up, I got a steady pour with a reasonable head. It’s not as smooth as a pub handpull or a proper keg system, but for a plastic pressure barrel it’s fine. The beer stayed carbonated for the time we took to drink it (around two weeks with a few people dipping into it). As the level dropped, I could feel the pressure drop slightly, but it never went completely flat. I didn’t use extra CO₂ bulbs on the first batch, just the natural carbonation from priming sugar.
So in practice, performance is good for a starter setup: it ferments, it holds pressure, and it pours drinkable beer without too much hassle. If you want more consistent pressure all the way down to the last pints, you’ll want to add CO₂ via the cap, but that’s an upgrade path rather than a problem. For a first kit, it gave me a batch that was honestly better than some pub pints, which says more about some pubs than the kit, but still, it’s a nice result.
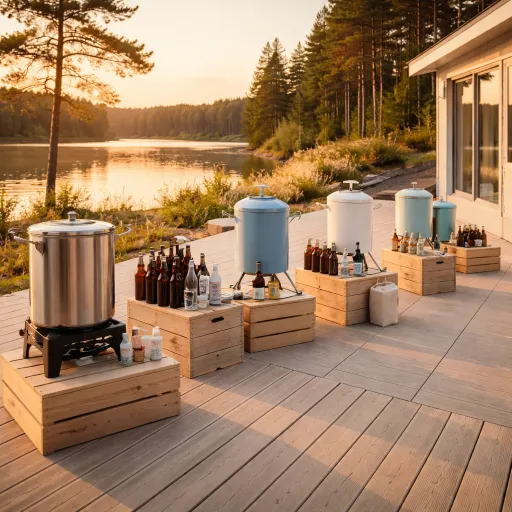
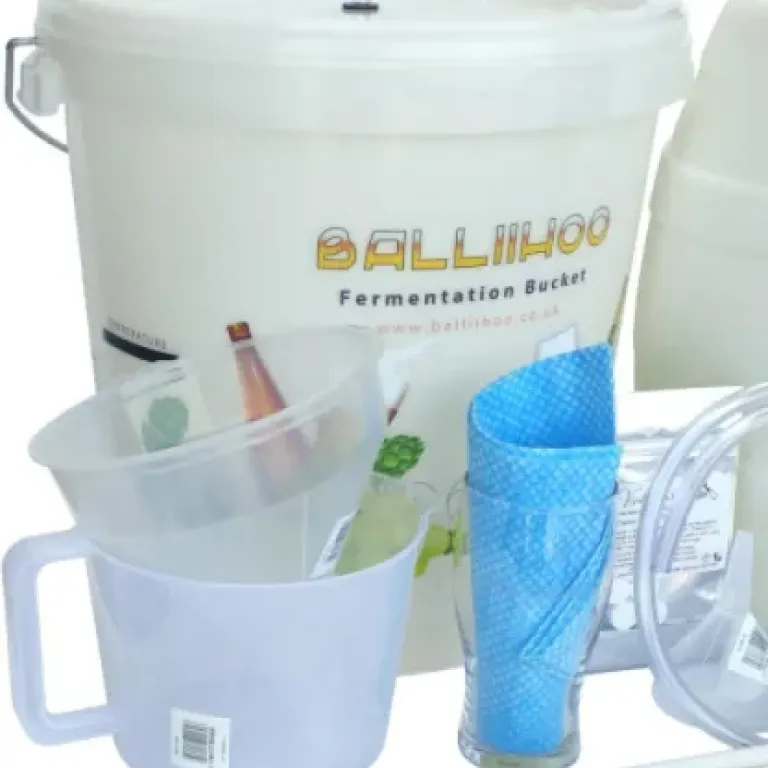
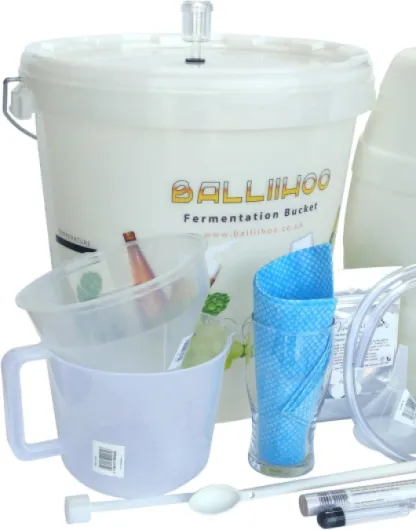
What you actually get in the box (and what you don’t)
The first thing when you open the kit: it feels like a proper bundle rather than a random collection of parts. You’ve got the fermentation bucket with lid and temperature strip, a pre-fitted grommet and airlock, syphon tube with racking cane, hydrometer, VinClasse cleaner/steriliser, long-handled spoon, large jug, 3 funnels, 2 cloths, a Balliihoo pint glass, and the pressure barrel with temperature indicator and CO₂ control cap. On paper, that’s basically everything you need hardware-wise to make 40 pints.
Reality check though: you still need to buy the beer ingredient kit and sugar/brewing sugar/spraymalt separately. For my first run, I used a standard 40-pint ale kit plus 1 kg brewing sugar. If you follow Balliihoo’s own advice and use brewing malt instead of sugar, you’re adding a bit more to the bill. Also, if you want to actually use the CO₂ control cap properly, you’ll need 16 g threaded food-grade CO₂ bulbs and the top-up tap, which are not included. So out-of-the-box, the cap is there, but you can’t really use the CO₂ side of it until you buy extras.
In terms of clarity, the instruction guide is okay. It’s not super glossy or anything, but it covers the basics: cleaning, mixing, fermenting, transferring, priming, and how to use the barrel. If you’ve never brewed before, you’ll probably still end up searching a couple of things online (like carbonation times or ideal temps), but you won’t be totally lost. It’s practical enough to get you through the first batch without panicking.
So, presentation-wise, I’d say the kit is complete for hardware, but slightly misleading if you assume “complete” means “ready to brew out of the box”. You need to add:
- a 40-pint ingredient kit
- 1–1.5 kg sugar/brewing sugar/spraymalt
- optionally CO₂ bulbs + tap
- a better thermometer if you want accurate readings
Effectiveness: does it actually help you brew decent beer?
When I talk about effectiveness here, I mean: does this kit make it easier for a normal person to brew drinkable beer without loads of extra purchases or technical knowledge. On that front, I’d say yes, but with a couple of small caveats. The fact that you get cleaner/steriliser in the box is a big plus. Cleaning and sanitising is the boring part, and having the right stuff from day one is important. I used the VinClasse cleaner exactly as described and had no infections, no off smells, nothing weird.
The hydrometer is another key bit. Mine arrived intact, but I’ve seen people mention broken ones in reviews. If yours is okay, it’s accurate enough to track fermentation progress. I took readings at the start and near the end, and they matched what I’d expect from the kit instructions. That gave me confidence that fermentation was done before transferring to the barrel. For a first-time brewer, that’s reassuring and stops you guessing.
Where the kit is slightly weaker is in the "nice to have" extras. The included temperature strip is fine, but I’d still recommend getting a better thermometer if you plan to brew regularly, especially lagers. Also, the instructions are decent, but they don’t go super deep into troubleshooting. If your room is too cold or too hot, or your fermentation stalls, you’ll probably still end up Googling. So the kit is effective as a framework, but it doesn’t hold your hand through every little problem.
End result-wise, my first batch came out very drinkable, with good carbonation and no weird flavours. That’s really what matters. The kit didn’t get in the way, and it didn’t introduce leaks or problems. If you follow the steps and keep things clean, it’s effective at doing what it’s meant to do: give you 40 pints of decent beer at home without a headache.
Pros
- Includes almost all the hardware you need to brew and barrel 40 pints in one kit
- Pressure barrel with control cap allows monitoring and topping up CO₂ (with extra bulbs/tap)
- Straightforward to use for beginners; first batch comes out clean and well-carbonated if you follow the steps
Cons
- Beer ingredient kit, sugar/malt, and CO₂ bulbs + top-up tap are not included, so total cost is higher than it first looks
- Accessories are basic; you may want a better thermometer and will likely replace seals or small bits over time
Conclusion
Editor's rating
Overall, the Balliihoo Homebrew Kit Complete Starter Set With Barrel And Co2 Control Cap is a solid choice if you want to get into homebrewing with a pressure barrel from day one. It gives you almost everything you need hardware-wise in one hit, the instructions are clear enough for a beginner, and the barrel system with the control cap is a step up from the ultra-basic plastic barrels. My first batch came out clean, well-carbonated, and very drinkable, which is really what I was hoping for.
It’s not perfect. You still have to budget for a beer ingredient kit, sugar or malt, and probably CO₂ bulbs plus the top-up tap if you want to use the cap’s full potential. The accessories are functional rather than fancy, and you may end up upgrading the thermometer or replacing seals over time. But nothing here feels like wasted money, and the overall package is practical and easy to live with.
I’d recommend this kit to anyone who: wants 40 pints on tap instead of messing with loads of bottles, prefers a straightforward setup with all the basics in one box, and expects to brew more than once. If you’re on a tight budget or just curious to try one batch and never again, a simpler and cheaper bucket-only starter kit might suit you better. For everyone else, this Balliihoo set is a good value, no-nonsense way to get into homebrewing and actually drink what you make without turning your kitchen into a science lab.
![93L Drinks Fridge, 126 Can Beer Fridge with Glass Door, Wine fridge with Adjustable Shelves for Soda Beer or Wine, Home/Bar/Office, Black, Steel, One-Touch Control [Energy Class F] 126 Can Black](https://www.beer-insiders.com/storage/947010/conversions/71yTIYeFRgL._AC_SL1500_-medium.webp)