Types of bottle storage that actually work for beer and wine
Classic glass bottles for long-term aging
For most homebrewers and small breweries, standard glass bottles remain the workhorse of storage. Brown glass protects beer from light better than green or clear, making it ideal for hop-forward styles and anything you plan to age. Choose thick, reusable bottles with crown caps for the best seal. Swing-top bottles are convenient for repeated use, but the gaskets must be checked regularly to avoid slow oxidation.
When cans and growlers make more sense
Cans are increasingly popular for both beer and, in some cases, still or lightly sparkling wines. They offer excellent protection from light and oxygen, and they chill quickly. The downside is that you need specific canning equipment and cannot easily reseal them once opened.
Growlers and crowlers are great for short-term storage and transport. A well-sealed stainless growler can keep beer fresh for several days under pressure. If you like to serve draft-style beer at home, a mini pressurized growler system can bridge the gap between bottling and full kegging, especially for small batches.
Cellaring wine and beer side by side
Many brewers also store wine, and the good news is that most bottle racks and cellars can handle both. Standard 750 ml wine racks will fit many Belgian-style beer bottles and larger formats. Just be sure that sparkling wines and highly carbonated beers are kept in bottles rated for pressure.
If you are planning a mixed cellar, think about access and labeling. Wine often lies for years, while some beers are best within months. Organize shelves so that short-lived beers are easy to reach and clearly dated, while long-aging bottles can rest undisturbed.
How to store beer bottles correctly : temperature, light and position
Getting temperature right for bottled beer
Temperature is the first thing that will make or break your bottled beer. Aim for a cool, stable range : roughly 10–15 °C (50–59 °F) for most styles. Warmer than that and you speed up oxidation and staling ; colder and you risk chill haze and muted flavours.
The key is stability. Constant swings between a warm kitchen and a cold garage will age your beer in all the wrong ways. If you do not have a dedicated cellar, a simple insulated box or a spare fridge with an external thermostat can keep your bottles in the safe zone.
Protecting bottles from light damage
Light is the enemy of hop character. UV rays react with hop compounds and create that infamous “skunky” aroma. Brown bottles help, but they are not magic shields. Clear and green bottles are especially vulnerable.
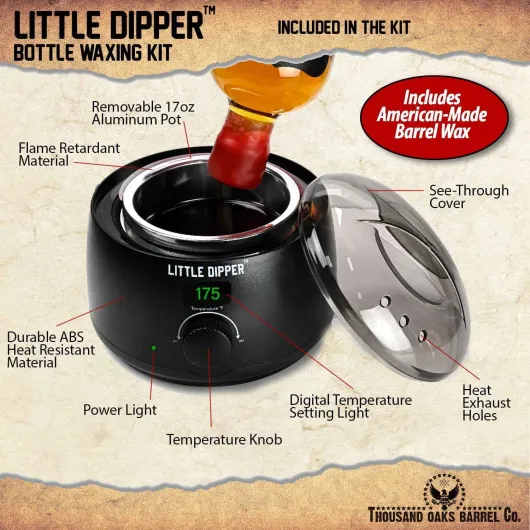
Store all bottles in the dark : a closed cupboard, a covered crate, or a lidded storage bin. If your only option is a bright room, wrap cases in a thick cloth or cardboard. For small batches, a compact kit with an opaque keg or fermenter, such as a small batch beer making starter kit with keg, can keep light away from your beer before and after bottling.
Should beer bottles be stored upright or on their side ?
Unlike wine, beer bottles are best stored upright. This keeps the yeast sediment at the bottom, reduces the surface area exposed to oxygen, and limits contact between beer and the cap liner, which can sometimes impart off flavours over time.
Horizontal storage only makes sense for corked specialty bottles that might dry out in very low humidity. For standard crown-capped bottles, vertical crates or shelves are simpler, cleaner, and better for long-term flavour stability.
Tools and accessories that make bottling and storage easier
Gear that keeps oxygen and mess under control
Good bottling starts with clean, reliable tools. A quality bottling wand with a spring-loaded tip helps you fill to a consistent level and minimizes splashing, which reduces oxygen pickup. Pair it with food-grade tubing sized correctly for your spigot or siphon to avoid leaks and foaming.
Use dedicated bottling buckets with a smooth interior and a spigot placed high enough to leave sediment behind. Keep a separate bucket for sanitizing solution so you are not constantly mixing and dumping between batches.
Cleaning and sanitizing tools you will actually use
Most storage problems begin with poor cleaning. A simple toolkit goes a long way :
- Bottle brush or drill-powered cleaner for stubborn deposits
- No-rinse sanitizer in a spray bottle for quick touch-ups
- Soaking tub or crate for batches of bottles and closures
- Drying tree or rack to keep bottles inverted and dust-free
Make these tools easy to reach near your bottling and storage area so you are not tempted to cut corners when you are tired on packaging day.
Closures, labels and organization helpers
Caps, corks and cages matter as much as the bottles themselves. Oxygen-scavenging caps or quality crown caps help extend shelf life, especially for hop-forward beers. For corked bottles, invest in a sturdy floor corker ; it gives better compression and a more reliable seal than handheld models.
Simple organization tools make long-term storage less chaotic :
- Plastic crates or stackable boxes sized for 12 or 24 bottles
- Waterproof labels or cap markers with fill date and style
- A basic inventory sheet or app to track what is aging where
Combined with the right temperature and light control, these accessories turn bottling and storage from a chore into a repeatable, low-stress routine.
Real life setups : how brewers store wine and beer without losing their minds
Small space, serious bottles
Many homebrewers start in apartments or small houses, so storage has to be smart. A common setup is a sturdy metal shelving unit in the coolest room, away from windows. Bottles are kept in their original cardboard cases or plastic milk crates to block light and make moving them easier. A cheap stick-on thermometer on the wall helps monitor that the room stays in a stable, cool range.
Some brewers use under-bed storage boxes for long-term aging. They line the bottom with a towel, lay bottles on their sides only if they are corked, and clearly label each box with style and bottling date. It is not glamorous, but it keeps light and temperature swings under control.
Garage and basement strategies
Garages and basements can be great, but only if you manage temperature and humidity. Many brewers dedicate a corner with insulated foam boards against the wall, then place shelves or stacked crates inside this “cool zone”. A small fan on a timer keeps air moving, reducing mold risk.
Where summers get hot, a secondhand fridge or chest freezer with an external temperature controller becomes the workhorse. Bottles are stored upright in plastic bins, sorted by style and ready-to-drink date. This mirrors the temperature and light rules you would use for wine, just tuned to beer styles.
Labeling and rotation that save your sanity
Brewers who stay organized use simple systems. Colored painter’s tape on caps or necks indicates style or ABV range. A permanent marker adds bottling date and batch code. Shelves are arranged “first in, first out” ; the oldest drinkable beers sit front and center.
Some keep a basic spreadsheet or notebook listing what is stored where, with tasting windows. This makes it easy to grab the right bottle at the right time, instead of digging through dusty boxes and guessing.