Why a diy keezer build changes your home beer game
From basic kegerator to true home bar centerpiece
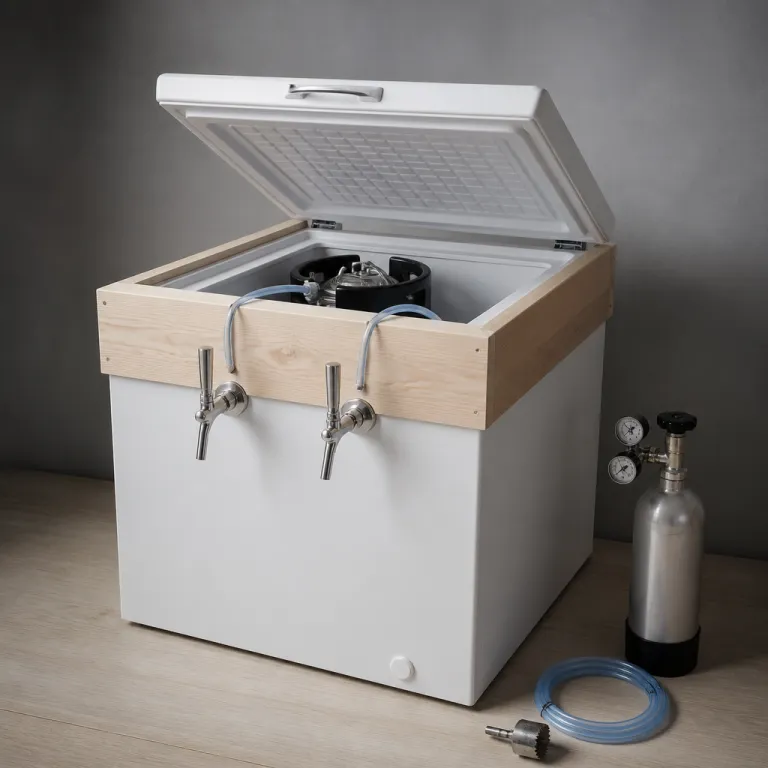
A keezer is more than a cold box with taps. By turning a simple chest freezer into a draft system, you move from “I have beer in the fridge” to “I run my own mini taproom at home”. The extra space, precise temperature control and multiple taps let you serve different styles at their ideal conditions, something a basic kegerator rarely manages.
Because you are starting from a freezer, you can tailor everything to your habits. Love rotating IPAs and lagers ? You can dedicate lines to each. Prefer one house pale ale on tap and a couple of guest kegs for friends ? That works too. Later on, when you plan the layout and gas system, this flexibility becomes even more important.
Why a keezer changes how you drink and share beer
Once you have a keezer, you stop thinking in six-packs and start thinking in kegs. That usually means fresher beer, less packaging waste and, over time, better value per pint. It also opens the door to serving your own homebrew on draft, especially if you already use an all-in-one system or are eyeing home draft dispensers and entry-level setups to get started.
A keezer also changes how you host. Instead of juggling bottles and cans in an overstuffed fridge, you pull clean, consistent pours at the perfect temperature. With a well-built collar, bar top and tap arrangement, it becomes a social focal point in your kitchen, garage or dedicated beer corner.
As you think ahead to the build details, gas lines and long-term cleaning routine, keep this in mind : a keezer is a practical project, but it is also a lifestyle upgrade that reshapes how you enjoy beer at home.
Planning your keezer build so it fits your beer habits
Clarifying how you actually drink beer at home
Before you grab tools or order parts, take a moment to map out how you really drink beer at home. Are you mostly pouring pints for yourself after work, or hosting big game nights ? Do you like rotating through many styles, or sticking to a couple of favorites on tap ? Your answers will shape everything from keezer size to the number of taps and gas lines you install later.
Think about :
- How many people usually drink at your place
- How often you pour draft beer during a typical week
- Whether you serve only beer, or also cider, soda or seltzer
- If you want room for aging special bottles inside the freezer
Choosing the right freezer size and layout
Once your habits are clear, match them to a chest freezer that can handle your plans. A compact model might be perfect for one or two kegs, while a larger unit gives you space for multiple kegs plus a CO₂ tank inside. Check internal dimensions carefully and sketch a quick layout of kegs, gas tank and lines.
If you expect to host parties or keep a variety of styles on tap, consider how many kegs you want to run at once and how many you will store cold as backups. Looking at commercial back-bar coolers, such as those reviewed in this bottle cooler capacity test, can give you a useful reference point for real-world storage volume and access.
Balancing budget, space and future upgrades
Finally, balance your wish list with your budget and available floor space. Leave room for a wood collar and bar top, and think ahead to extra taps or a larger gas manifold. Planning for a bit of growth now will make the build phase smoother and keep your keezer flexible as your beer tastes evolve.
Building the wood collar and bar top on your chest freezer
Measuring, cutting and sealing the collar
The wood collar is the backbone of your keezer build. It creates the extra height you need for kegs and gives you a solid place to mount taps later on. Start by carefully measuring the outer lip of your chest freezer. Transfer those measurements to your lumber, double-checking each side before you cut.
Use straight, clean cuts so the corners meet tightly. Most builders go with simple butt joints screwed together, but you can use mitered corners if you want a more furniture-like finish. Dry-fit the collar on the freezer to confirm it sits flat and doesn’t rock. When you are happy with the fit, seal the inside surfaces with exterior-grade paint or a clear sealer to protect the wood from condensation.
To attach the collar, remove the freezer lid and set it aside. Run a bead of high-quality silicone around the freezer rim, then gently press the collar into place. Clamp it if possible and wipe away any squeeze-out. This airtight seal is important for stable temperatures and efficient cooling, which you will appreciate when you start dialing in your serving profiles.
Shaping a bar top that feels like part of your home
Once the collar is solid, you can add a bar top that matches your space and your beer habits. Many homebrewers choose a simple plywood top with edge trim, while others go for butcher block or reclaimed wood for a warmer, pub-style look.
Whatever you choose, overhang the top slightly on all sides so glasses and tasting flights have room. Pre-drill from underneath to secure the top to the collar, avoiding the path where your future tap shanks and beer-enhancing accessories will run. Finish with stain, varnish, or a durable bar-top epoxy so spills wipe up easily during your tasting sessions.
Installing taps, gas lines and temperature control for clean pours
Mapping out your tap layout
Before you drill a single hole, stand in front of your keezer and picture how you pour. Right-handed or left-handed ? One tap or four ? Mark the front of the collar with painter’s tape, then measure and center your layout. Leave enough space between shanks for tap handles to move freely and for your fingers to wrap around them comfortably.
Most home setups work well with taps spaced 3 to 4 inches apart. Keep them high enough that a tall glass or growler fits under the faucet without tilting.
Installing shanks and faucets
Drill holes through the wood collar using a hole saw sized for your shanks. Go slow to avoid splintering. Slide each shank through from the outside, add the backing plate and nut inside, then tighten firmly but not so hard that you crush the wood.
Wrap the shank threads with a couple of turns of plumber’s tape before attaching the faucets. This helps prevent tiny leaks and keeps everything snug.
Routing gas lines and regulators
Mount your CO₂ tank and regulator outside the keezer if you have space ; it is easier to adjust pressure and read the gauges. Run gas lines through the collar via a small drilled hole or a bulkhead fitting, then split them with a manifold if you have multiple kegs.
Label each gas line with its serving pressure. This makes it simple to keep a pale ale, a stout and a lager all pouring the way they should.
Dialing in temperature control
Plug the freezer into an external temperature controller and set your target serving temperature. Place the probe in a thermowell or tape it to a water-filled bottle inside the keezer so it reads liquid-like temperatures, not just air swings.
Give the system a full day to stabilize before judging carbonation or pour quality.
Living with your keezer : tastings, cleaning and honest costs
Dialing in your pour for perfect pints
Once your keezer is running, the first job is tuning your pours. Start by checking serving temperature and pressure together, not separately. If your beer is too foamy, lower the pressure slightly and give it a few hours to stabilize. If pours are flat or sluggish, raise the pressure in small steps. Keep lines as short and direct as possible, and make sure the faucet is fully open when you pour.
Glassware matters more than most people think. Use clean, beer-only glasses, rinsed with cold water just before serving. Avoid any detergent residue, as it kills head retention and aroma. Over time, you will notice which glasses suit your favorite styles and serving volumes best.
Simple routines to keep your keezer fresh
A keezer is low maintenance if you build a few habits. Wipe up spills inside the collar and on the lid as soon as you notice them. Every few weeks, unplug the unit briefly and check for ice buildup on the walls ; a thin layer is normal, thick frost is not. Defrost if needed and dry the interior before restarting.
Clean your beer lines regularly. A basic routine is to flush with warm water after each keg, then run a proper line cleaner every few kegs or every couple of months, depending on how often you pour. Do not forget to disassemble and soak faucets and disconnects ; dried beer here is a common source of off flavors.
Realistic costs and small upgrades over time
After the initial build, your main costs are electricity, CO₂ refills, replacement parts and the beer itself. Track how long a CO₂ cylinder lasts and how many kegs you serve ; this gives you a clear cost per pint. Over time, you may add small upgrades like better tap handles, extra kegs or a drip tray. Spread these purchases out and let your actual drinking habits guide what you improve first.