Why clean beer lines matter more than you think
What really happens inside dirty beer lines
When beer leaves the keg, it is in great shape ; cold, carbonated, and full of aroma. The moment it enters your draft lines, though, it starts interacting with everything inside that tubing. If those lines are not cleaned regularly, a hidden ecosystem begins to grow ; yeast, bacteria, and beer stone slowly build up and change the way your beer tastes, smells, and even looks in the glass.
Beer is rich in sugars, proteins, and minerals. Each pour leaves a microscopic film on the inner walls of your lines. Over time, this residue hardens into beer stone and provides the perfect surface for microbes to cling to. Once they are established, they form a biofilm that normal rinsing will not remove. That is when you start noticing off-flavors, from buttery or sour notes to a dull, cardboard-like finish.
How dirty lines ruin good beer
Even the freshest keg cannot overcome a neglected draft system. Dirty lines can cause excessive foaming, flat pours, and muted hop character. Aromas that should be bright and clean become muddy. In extreme cases, you might even see particles in the glass or smell a faint vinegar or sulfur note. Many homebrewers blame the keg or the recipe, when the real culprit is the line.
There is also a hygiene and safety angle. While most beer-spoiling microbes are not dangerous, they can still cause stomach discomfort and make your home bar feel less inviting. If you ever transfer homebrew using tools like an auto siphon for homebrewing, you already know how easily equipment can pick up residue and off-flavors. Your kegerator lines are no different ; they need a structured cleaning routine, the right tools, and a few pro habits to stay in top shape.
How often should you clean a home kegerator draft system
Typical cleaning frequency for home kegerators
For most home setups, cleaning your beer lines every two weeks is a solid rule of thumb. This interval keeps flavor consistent and prevents yeast, hop resins, and beer stone from building up inside the lines. If you only pour a few pints a week, you might stretch it to every three weeks, but going longer starts to risk off-flavors and hazy, sluggish pours.
Any time a keg kicks and you are swapping to a new one, it is smart to run a full cleaning cycle before tapping the fresh keg. That way, you are not pushing old residue and stale beer into your new brew.
When you should clean more often
Some situations call for more frequent cleaning :
- Heavily hopped beers (IPAs, double IPAs) leave sticky hop oils that cling to lines.
- Sweet or flavored beers can leave sugars and flavorings that attract bacteria.
- Warm storage or poor cooling accelerates microbial growth in the lines.
- Slow-draining or foamy pours often signal buildup or partial blockages.
If you notice any of these, shorten your cleaning interval to every 7–10 days until things stabilize.
How your kegerator setup affects the schedule
The more complex your draft system, the more disciplined you need to be. Long draw lines, multiple taps, and higher serving temperatures all increase the risk of buildup. Pairing your kegerator with a reliable back bar bottle cooler or similar cold storage helps keep everything at stable temperatures, which slows down microbial growth but does not replace regular cleaning.
As you refine your routine, you will see how cleaning frequency connects directly to the flavor and clarity benefits you get from proper line maintenance and the tools you use later in your process.
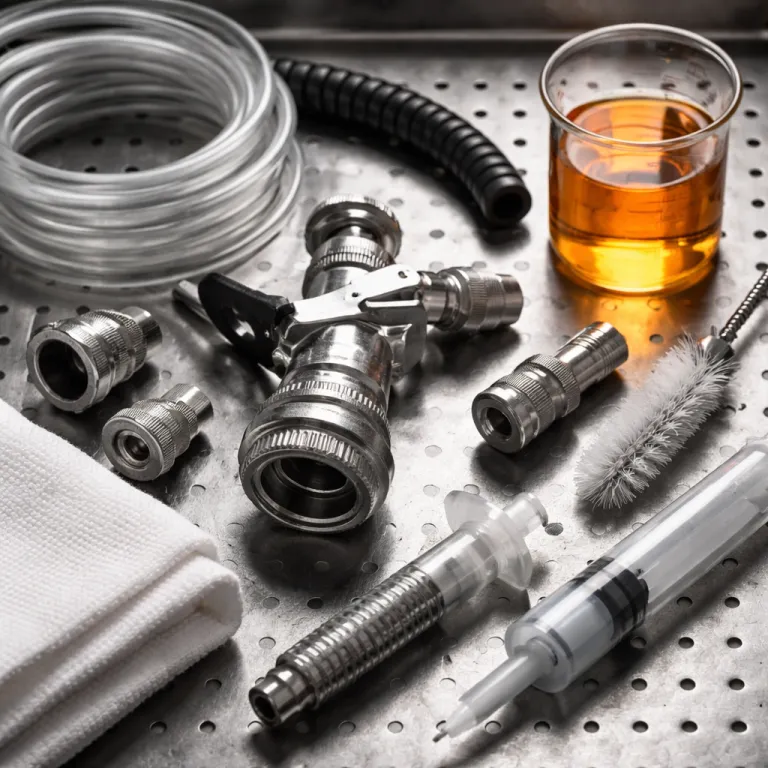
What you need for proper kegerator line cleaning
Essential tools for cleaning your draft lines
To clean your kegerator lines properly, you need a few dedicated tools. A basic setup includes :
- Cleaning bottle or pump – This connects to your beer line in place of the keg and pushes cleaning solution through the system.
- Line cleaning solution – An alkaline beer line cleaner formulated to break down proteins, hop resins, and biofilm. Do not substitute with dish soap.
- Rinse water container – A clean bucket or pitcher filled with cold water to flush out the cleaner.
- Faucet wrench – A small, inexpensive tool that lets you remove and reassemble the faucet without damaging it.
- Faucet brush and line brushes – Narrow, long brushes to scrub inside the faucet body and any accessible tubing.
- Food-safe sanitizer – Used after rinsing to reduce any remaining microbes before you pour your next pint.
- Protective gear – Basic gloves and eye protection, as line cleaners are caustic.
Choosing the right cleaner and accessories
Not all cleaners are equal. Look for a beer line cleaner specifically labeled for draft systems, and follow the manufacturer’s dilution and contact-time instructions. If you are already into homebrewing or plan to be, it is worth building a small cleaning kit that also supports your brewing gear. A good starting point is to pair your draft maintenance with the kind of equipment and methods outlined in this comprehensive homebrewing guide, so your hoses, taps, and fittings stay in top shape from brew day to pour day.
Finally, keep a dedicated tub or crate where you store all your cleaning tools. When it is time to follow your regular cleaning schedule, everything will be in one place and you will be far more likely to stick to the routine.
Step by step kegerator line cleaning guide for home use
Get your kegerator ready for cleaning
Start by unplugging your kegerator and closing the CO₂ tank. Turn off the gas at the regulator, then disconnect the keg coupler from the keg. Pull the tap handle to release any remaining beer and pressure from the line.
Remove the faucet from the shank using a faucet wrench. This is where a lot of sticky residue builds up, so set it aside for a separate scrub.
Mix and circulate your cleaning solution
Fill your cleaning bottle or pump with warm water and the recommended amount of draft line cleaner. Attach the cleaning bottle to the shank where the faucet was, making sure the connection is snug.
Place the keg coupler in a bucket or sink to catch the solution. Pump the cleaner through the line until it runs steadily from the coupler. Let the solution sit in the line for the contact time suggested by the cleaner manufacturer, usually several minutes.
Rinse thoroughly to protect flavor
Empty the cleaning bottle, then fill it with clean, cold water. Pump the water through the line until it runs clear and you no longer see or smell any cleaner. Proper rinsing is crucial ; leftover cleaner can ruin your next pours.
Detail clean the faucet and coupler
Use a small brush to scrub the faucet body, spout, and any internal parts you can remove. Do the same with the keg coupler, focusing on beer-contact surfaces and seals. Rinse everything well with clean water.
Reassemble and test your system
Reattach the faucet to the shank, reconnect the coupler to the keg, and open the CO₂ tank and regulator. Plug the kegerator back in, then pour a small sample to confirm the beer runs clear, tastes fresh, and shows no off-flavors.
Pro tips from breweries to keep your kegerator clean longer
Borrowing habits from professional cellarmen
Breweries treat draft hygiene as part of the brewing process, not an afterthought. You can do the same at home by building small habits into your routine. Keep a simple log of each cleaning session with the products you used and any issues you noticed ; this makes it easier to spot patterns like recurring foam problems or off-flavours.
After each keg change, give your coupler, faucet, and drip tray a quick rinse with warm water and a food-safe cleaner. It takes less than a minute and prevents dried beer from turning into stubborn residue that is harder to remove during your full cleaning cycle.
Smart ways to reduce buildup between cleanings
Professional draft techs focus on limiting what can grow in the lines between cleanings. At home, you can :
- Keep your kegerator temperature stable ; warm swings encourage microbial growth and excess foaming.
- Always close the faucet fully and avoid leaving beer sitting in the spout ; a quick purge after pouring helps.
- Use faucet caps or plugs when you are not pouring for a while to keep fruit flies and dust out.
- Wipe the faucet exterior regularly with a clean cloth and sanitizer to stop sticky beer film from forming.
When breweries replace, not just clean
Even in breweries, lines and gaskets do not last forever. If you notice persistent off-flavours, staining inside the tubing, or cracks in seals and washers, it is time to replace those parts rather than scrub harder. Vinyl beer lines are inexpensive ; swapping them every so often can instantly improve flavour and reduce how often you need deep cleans.
Apply the same mindset to your brushes, o-rings, and couplers. Worn tools and seals make cleaning less effective and can introduce new contamination, undoing the careful work you put into your regular routine.